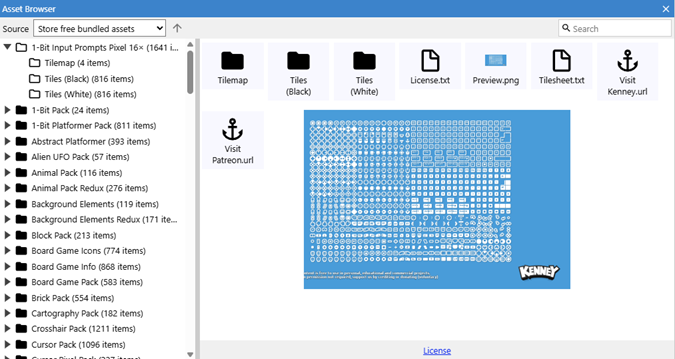
The Asset Browser is used to browse for assets and quickly import them into a project.
 The asset browser
There are four main sources for assets that can be picked from the dropdown menu:
- Store free bundled assets: these asset packs are bundled with C3 and available to all accounts, free and subscribed.
- Store premium bundled assets: these asset packs are bundled with C3 and are available to accounts with an active subscription only.
- Store purchased assets: these asset packs are the ones that have been purchased in Scirra's Asset Store.
- Local assets: the asset browser can be used select one or more folders in the local file system. This feature's availability is subject to browser support.
Importing assets
Assets can be imported into a project in three main ways:
- Double clicking
- The quickest way to import a single asset. Depending on the type of the asset, something different will happen when importing. Below is a table showing how the different types will be handled.
| Type |
Description |
| Images |
Are imported as a new Sprite with a single animation and a single frame. |
| Animations |
Formats such as .gif, are imported as a new Sprite with an animation with as many frames as the asset has. |
| SVG |
Are imported as a project file in the project's Files folder and a new SVG Picture using the corresponding project file. An instance is created in the middle of the currently active layout view. |
| Audio |
A dialog appears before importing audio assets to choose their destination and are then imported into either the Music or Sounds project folder. |
| Videos |
Are imported into the Videos project folder. |
| Fonts |
Are imported into the Fonts project folder. |
| Scripts |
Are imported into the Scripts project folder. |
| Other |
Other supported types are imported into the Files project folder. |
- Drag & Drop
- Assets can be dragged and dropped onto the layout view or the project bar to import them into the project. Below is a table showing how the different types will be handled.
| Type |
Description |
| Images |
A dialog appears with options about how the assets should be treated:
- As object types: will create a new object type for each asset, each one using an asset as it's image.
- As single object type: will create a single object type with an animation with as many frames as assets where selected.
- As icons: all assets are imported into the Icons & screenshots project folder.
|
| Animations |
This applies for animated formats, such as .gif or .apng. A dialog appears with options about how the assets should be treated:
- As object types: will create a new object type for each selected asset, each one with an animation with as many frames as each asset has.
- As single object type: will create a single new object type with a unique animation for each imported asset.
|
| SVG |
Are imported as a project file in the project's Files folder and a new SVG Picture using the corresponding project file. |
| Audio |
A dialog appears before importing audio assets to choose their destination:
- As music: all the assets are imported into the Music project folder.
- As sound: all the assets are imported into the Sounds project folder.
|
| Videos |
Are imported into the Videos project folder. |
| Fonts |
Are imported into the Fonts project folder. |
| Scripts |
Are imported into the Scripts project folder. |
| Other |
Other supported types are imported into the Files project folder. |
- Context menu
- Assets can also be imported by clicking on the import option at the top of the context menu for a given asset. In the case of selecting a single asset or many assets of the same type, there will be a single import option. If the context menu is brought up when multiple assets of different types are selected, there will be options to import the assets of each type individually.
Importing zip files
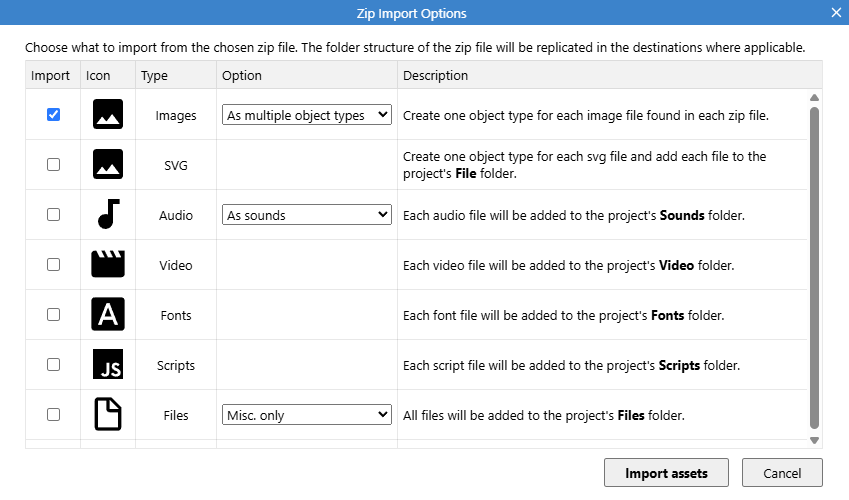
Zip files have a slightly different workflow to regular assets. After using any of the methods described previously to import, a dialog appears to choose which files of the zip file should be imported and what to do with them in the cases there are multiple options for them.
 Zip import dialog showing all possible options
The image shows what the dialog looks like when the zip file has files of all the supported formats. In cases in which a format is not present in the zip file, then the corresponding option will not be shown in the dialog.
To import all the files of a given type tick the corresponding checkbox, if the asset type has additional options about how the assets should be treated, select it from the corresponding dropdown. Below is a table with all the possible options.
| Type |
Description |
| Images |
- As multiple object types: will create a new object type for each asset, each one using an asset as it's image. If the asset is an animated format, such as .gif or .apng, the asset is used to fill up an animation, if the chosen object type supports it.
- As single object type: will create a single object type with an animation with as many frames as assets where selected. Any animated formats are interpreted as an individual animation in the new object type.
- As icons: all assets are imported into the Icons & screenshots folder. Animated formats are not imported as icons.
|
| SVG |
Are imported as a project file in the project's Files folder and a new SVG Picture using the corresponding project file. |
| Audio |
- As sound: all the assets are imported into the Sounds project folder.
- As music: all the assets are imported into the Music project folder.
|
| Video |
All assets are imported into the Videos project folder. |
| Fonts |
All assets are imported into the Fonts project folder. |
| Scripts |
All assets are imported into the Scripts project folder. |
| Files |
- Misc. only: only assets which are not any of the other types are imported into the Files project folder.
- All: all the assets in the zip file are imported into the Files project folder.
|
Other Context Menu Options
Other options in the various context menus are the following:
| Option |
Description |
| Download |
Download the selected asset to the local file system. In case of selecting multiple assets, everything is compressed into a zip file. Using this option on a folder will download all the contents of the folder, compressing it into a zip file. |
| Preview |
Bring up a dialog to preview the contents of the selected asset |
| License terms |
Open a new page with the license associated with the asset. |
| Visit asset website |
Open a new page with the asset's website. |
| Explore |
This option appears when bringing up a context menu of a zip asset. Allows to explore the contents of the zip as if it was a folder. After using this option double clicking on the zip will open it as a folder instead of importing the contents. |
| Find folder in tree |
Scroll the tree pane to show the folder a given asset belongs to. |
| Expand/Collapse All |
Expand or collapse all the selected folders in the tree pane. |
Settings dialog
Clicking on the three dot button next to the close button brings up the settings dialog for the Asset Browser, in it you can find the following options:
- Tag new frames with asset name when importing as many object types
- Toggle this setting and the animation frame for each of the created object types will be tagged with the name of the corresponding asset.
- Tag new frames with asset name when importing as single object type
- Toggle this setting and each animation frame of the created object type will be tagged with the corresponding asset's name. This option will not apply when importing an animated format, such as .gif or .apng, because the extracted images don't have a name. In the case of importing a zip file which has a c3-import-setting.json file used by the Animations Editor for bulk importing, any tag names in that file will be preferred over asset names.
Browsing assets in the local file system
As mentioned earlier you can browse folders in the local file system, to do so first choose the Local assets option from the dropdown in the main toolbar and then click on the + button to choose a folder.
Different folders can be added and will be stored for future use.