The 9-patch plugin allows an image to be resized by stretching or tiling the edges, corners and fill separately. It is useful for conveniently making resizable windows or user interface elements that can take any size and still appear correctly. The image below demonstrates how a 9-patch looks compared to a Sprite object, which just stretches its entire image.
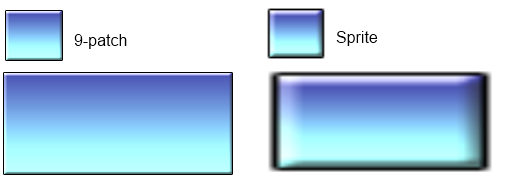 Example of 9-patch scaling
You can also click here to open an example of the 9-patch plugin.
The 9-patch object uses a single image, but automatically cuts it up in to nine sections using margins set in the object properties. By setting the left, top, right and bottom margins, the object then automatically works out the size and position of all nine sections.
 Sections in a 9-patch
The edge and fill sections can be stretched or tiled independently, allowing for a better appearance when resized.
When resized very small, the bottom-right patches will be drawn on top of the top-left patches. This can be useful for representing things like progress bars with special artwork at the end of the bar. Note however that 9-patch objects do not support being mirrored or flipped, so the width and height should not be negative.
For an interactive demo of the 9-patch plugin, see the 9-patch example in the Example Browser.
Scripting
When using JavaScript or TypeScript coding, the features of this object can be accessed via the I9PatchInstance script interface.
9-patch properties
- Image
- Click the Edit link, or double-click the object in the Layout View, to edit the source image used for the 9-patch.
- Left margin
- Right margin
- Top margin
- Bottom margin
- The margins of each side of the 9-patch, in pixels. See the image above for a visualisation of how these margins are used to determine the nine sections. Note these margins apply to the source image, ignoring the image scale properties.
- Edges
- Use Stretch to stretch each edge patch to the size of the object. Use Tile to repeat the edge patches instead.
- Fill
- Use Stretch to stretch the fill patch to the size of the object. Use Tile to repeat the fill patch inside the object instead, like a Tiled Background. Use Transparent if you don't want a fill image.
- Image scale X
- Image scale Y
- Adjust the scale of the patches drawn inside the object. The margins are applied to the source (unscaled) image, but then the patches are drawn with the provided scale, increasing the visual size of the margins.
- Initial visibility
- Set whether the object is visible or invisible at the start of the layout.
- Origin
- Choose the location of the origin of the object relative to its bounding rectangle.
- Seams
- To ensure seamless rendering under all circumstances, by default the patches internally overlap by 1 pixel (using the Overlap setting). However for semi-transparent patches this can cause a visible seam; in this case it is preferable to use the Exact setting instead.
9-patch conditions
- On image URL loaded
- On image URL failed to load
- Triggered when Load image from URL finishes downloading the image and is ready to display it, or if the load fails.
9-patch actions
- Set edges
- Set fill
- Set image X scale
- Set image Y scale
- Set seams
- Set the corresponding properties - see the section above for more details. Each of these settings can be changed on a per-instance basis.
- Set margins
- Set the corresponding margin properties - see the section above for more details. By default all 9-patch instances share the same set of patch images, and so changing the margins will affect all instances, regardless of which instances were affected by the event's conditions. However the exception to this is after using the Load image from URL action, in which case the instance is using its own unique patch images, and the margins can then be changed for that instance only.
- Load image from URL
- Load an image from a given URL. It is not shown until the image has finished downloading. Images loaded from different domains are subject to the same cross-domain restrictions as AJAX requests - for more information see the section on cross-domain in the AJAX object. Data or blob URIs can also be passed as an image, e.g. from a canvas snapshot or camera image. Once this action has finished, the Set margins action can be used to set new margins for the loaded image, but note that to avoid affecting other instances, the image load must have first completed successfully (either triggering On image URL loaded or after using Wait for previous actions to complete).
9-patch expressions
- LeftMargin
- RightMargin
- TopMargin
- BottomMargin
- Return the corresponding margin properties used by the instance.
- ImageScaleX
- ImageScaleY
- Return the current image scale properties as a percentage, with 100 representing 100% (normal) scale.