The Layers Bar is used to add, edit and remove layers in a layout. A layer is like a sheet of glass objects are painted on to. This allows easy arrangement of which objects display in front of other objects, for example showing foreground objects in front of the background sprites. It also allows for interesting depth effects like Z elevation or parallax, and layers can be individually scaled and rotated as well.
Layers can be dragged and dropped in the Layers Bar to change their order. Layers at the bottom of the list are displayed at the back (e.g. background objects), and layers at the top of the list are displayed at the front (e.g. HUD objects).
Selecting a layer displays its properties in the Properties Bar and also sets it as the active layer which new objects are inserted in to.
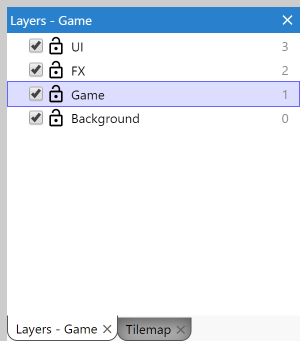 The Layers Bar
The Layers list
Each layer in the list has the following:
- A checkbox to toggle whether the layer is visible in the editor (this does not affect the game when previewing or exporting)
- A padlock icon. Clicking this toggles the layer's locked status. If a layer is locked, objects on that layer cannot be selected in the editor. This is useful to prevent accidental selections on rarely-used layers like backgrounds.
- An optional globe icon to denote global layers.
- An optional tag icon to denote HTML layers.
- A number to the right. This is a zero based index of the layer (the first layer is number 0, not 1). If you need to enter a layer number in the event system, this is the corresponding number. You can also enter layer names in the event system, which is often more convenient since unlike the numbers, the names don't change if you reorder layers.
You can right click a layer to see a menu of additional options, such as to add a new layer, rename or delete layers, or shortcuts to show, hide, lock or unlock all layers (or all but the selected one). Layers which are showing content from a global layer will show a context menu option to go to the layout where the original global layer is in.
Sub-layers
Layers can also be added as sub-layers of another layer. They can be added as sub-layers or moved to be sub-layers via drag-and-drop. Sub-layers appear indented in the Layers Bar to show they come under another layer, and the layer they belong to can be expanded or collapsed to show or hide all its sub-layers.
Sub-layers can be used solely to help organize long layer lists, acting like layer folders. However applying an effect to a layer will also affect all its sub-layers. This allows for more efficiently processing effects (instead of having to add the same effect repeatedly to several layers), as well as more advanced effect composition across different groups of layers.
Object Z ordering
To modify the Z order (front-to-back order) of individual objects on a layer, use the Z Order Bar Paid plans only.
Project-wide changes
The Layers Bar provides some options to make changes to layers across the entire project.
When right-clicking a layer, the Project-wide changes submenu provides two options. These are designed to help manage large projects. For example if you have 100 layouts each with the same set of 10 layers on them, and then you want to add an 11th layer, it is tedious to have to make 100 updates. These options allow making these kinds of changes automatically. Note this is different to global layers, which copy the content of a layer; project-wide changes are designed to manage the structure of layers, i.e. which layers are present for certain layouts.
Replicating a layer across the project
The Replicate this layer across project option will match all layers in the project with the same name (case-insensitive), and then copy the selected layer's properties and the structure of all its sub-layers to all the other matching layers.
Updating the structure of sub-layers means that it will add, reorder and remove sub-layers of the matching layers in the project to match the selected one. This process continues recursively, so sub-layers of sub-layers will also be updated, and so on. This also copies layer properties for all sub-layers, so all layer settings are updated as well.
Where sub-layers match (by name, case-insensitive), they will be reordered to match the order of the selected layer, accounting for layer reordering. If the selected layer has a sub-layer which the matching layer doesn't have (by name, case-insensitive), then the matching layer will add a new sub-layer with that name, accounting for adding new layers. If the matching layer has a sub-layer which the selected layer doesn't have (by name, case-insensitive), then the matching layer will delete the sub-layer, accounting for removing layers.
If this option is used after renaming a layer, it will count as deleting the old layer name from matching layers, and then add a new empty layer with the new name. This is because this process cannot tell the difference between deleting a layer and adding a new one from renaming a layer. In order to support renaming layers, a separate option for renaming layers across the project is provided.
Renaming a layer across the project
The Rename layer across project option is designed to solve the problem of layer replication treating renames as removing the old name and adding the new name. When you choose this option a dialog appears for you to type in a new layer name. Then it will find all layers in the entire project with the old name (case-insensitive), and rename them all to the newly entered name. This operation can be undone.
Suggested workflow
The suggested workflow is to make all layers that you might want to replicate as sub-layers of a parent layer. For example consider the following layer tree:
- User interface
- Game
- Explosions
- Gameplay
- Background
Suppose this layer structure is repeated over 100 layouts, and then you decide you want to rename Background to Lower background, and add a new Upper background layer above it. You can perform the following steps:
- Right-click the Background layer and select Rename layer across project
- Enter the name Lower background and press OK
- Right-click the newly renamed Lower background layer and select Insert layer above to add a new layer above it
- Enter the name Upper background for the new layer
- Right-click the parent layer Game and choose Replicate this layer across project to add the new layer in all other layouts
The new layer tree should now look like this in all layouts:
- User interface
- Game
- Explosions
- Gameplay
- Upper background
- Lower background
Similarly, you could make batch updates to the User interface layers taking advantage of the fact the relevant layers are all sub-layers of that layer.
As project-wide changes match layers by name, you may wish to make sure layer names are unique depending on their purpose. For example you may want to avoid using a layer named Game in the title or menu layouts of your project, as otherwise it would also be affected by project-wide changes intended for the Game layer in the actual gameplay levels of your project.