The Layout View is a visual designer for your objects. It allows you to set up a pre-arranged layout of objects, such as a game level, menu or title screen. In other tools, layouts may be referred to as scenes, rooms, frames or stages. See also the manual section on layouts.
 The Layout View
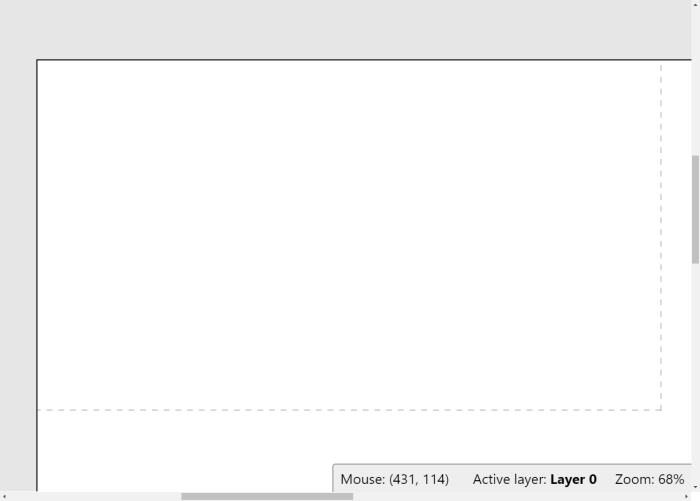
The dashed rectangle in the top left of the layout area indicates the viewport size in the layout. By default the viewport appears in the top left of the layout, so to align something relative to the viewport, it should be placed inside this rectangle.
In the corner of the view appears a small status bar with information about the current mouse position in the layout, the current zoom level, and the current active layer. The active layer is important since it is the layer new object instances are added to. The active layer can be changed by selecting a different layer in the Layers Bar.
Adding, modifying and deleting objects
Double-click a space in the layout or right-click and select Insert new object to add a new object type. This will bring up the Create New Object Type dialog.
To create new instances of an existing object type, another object can be control + dragged, copy and pasted, or dragged and dropped from the Project Bar. (Make sure you're clear on the difference between Object Types and Instances as described in Project Structure.) When dragging and dropping from the Project Bar, you can also use templates to define the default properties of the instance that is created.
A shortcut for importing image files as Sprite objects is to drag and drop image files in to the Layout View. This automatically creates a new Sprite object type with the dragged image. If multiple image files are dragged, the Sprite is assigned an animation with the dragged images as animation frames. Where supported, animated image file formats like GIF and APNG can also be dragged and dropped in and will be used as a Sprite animation. (Animated image file formats can also be imported to the Animations Editor where they will also be split out in to separate frames.)
SVG files can also be drag-and-dropped in and a SVG Picture object will be created for it.
Instances can be moved by dragging and dropping them with the mouse. Hold Shift to axis-lock the drag to diagonals. Alternatively they can be nudged 1 pixel at a time with the arrow keys (hold shift to nudge 10 pixels), or co-ordinates can be typed in directly to the Properties Bar.
The Delete key or right-click Delete option deletes instances. Deleting all instances of an object does not remove the object type from the project. To entirely remove an object from the project it should be deleted via the Project Bar.
Click objects to select them. Objects cannot be selected if their layer is locked. Hold Control while clicking to select multiple objects, or click and drag a selection rectangle to select all objects in an area. The Properties Bar displays properties for all currently selected objects, so changing a property sets it for every selected object.
When a single object is selected it appears with resize handles around it.
Click and drag the resize handles to stretch the object. Hold Shift to proportionally resize the object. Hold control to resize relative to the object origin, which appears as a small dot on the selected object.
Rotatable objects like Sprite can be rotated by moving the mouse just outside the resize handles, away from the object. When you do this the mouse cursor will change to a rotation arrow. When you see this, click and drag to rotate the object.
Sometimes the resize handles, or rotate cursor, can get in the way of other objects. If this happens, hold Alt to temporarily hide the resize handles and disable rotation. This allows you to select another object instead of modify the selected object.
Using tilemaps
If you are designing a tile-based game, you can insert the Tilemap object and edit tiles in the Layout View. To find out more, see the manual entry on the Tilemap Bar.
Scrolling and zooming
There are a few ways to scroll in the Layout View:
- The vertical and horizontal scrollbars at the edges of the view
- Scroll the mouse wheel to scroll vertically. You can also hold Shift to scroll horizontally.
- Hold the middle mouse button and drag the mouse
- Hold Space and move the mouse (useful for laptops with track pads)
On desktop systems, middle-mouse dragging is probably the most convenient way to move around the layout.
Zooming is useful to focus on a small area or see an overview of the entire layout. There are several ways to zoom:
- The Zoom options in the View menu when right-clicking in the Layout View
- Hold Control and scroll the mouse wheel. Hold both Control + Shift to double or halve the zoom (e.g. 100%, 200%, 400%...)
- Ctrl and + or - on the keyboard. Hold Shift to double or halve the zoom.
Press Control + 0 to return to 100% zoom.
Selection wrapping
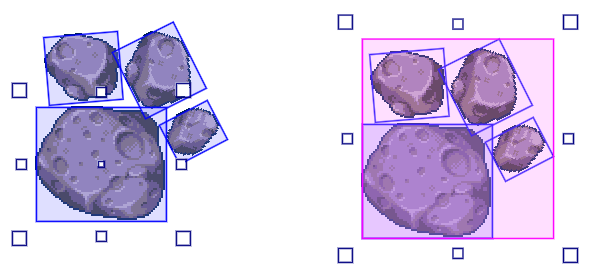
If you select two or more objects, you can wrap the selection by pressing Enter or right-clicking and selecting Wrap selection. This allows you to rotate and stretch the selection as a whole.
Wrapped selections appear with a different color selection box, as shown below:
 Wrapping a selection in the Layout View
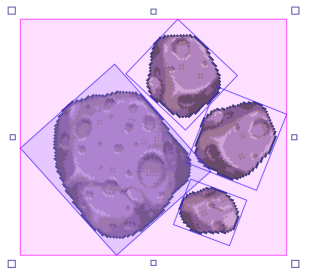
Wrapped selections can be resized and rotated as if they are one large object. For example the selection can be enlarged and rotated, and all objects maintain their position relative to each other.
 Wrapped selections resize and rotate as one
While a selection is wrapped, click any of the objects in the wrapped selection to make that object the rotation origin.
Containers
Objects that are grouped in to Containers highlight yellow in the Layout View. Containers can also be set to automatically wrap their selection. If you still need to select an individual object in an automatically wrapped selection, hold Alt and click one of the objects.
Setting up a hierarchy
You can connect objects together in a hierarchy - also known as a scene graph - in the Layout View. This works similarly to using the Add child hierarchy action, but set up in the editor.
To set up a hierarchy, select multiple objects, and then right-click the object you wish to be the parent (i.e. above the others in the hierarchy) and select Hierarchy►Add selection to this instance. Arrows will appear pointing from the parent to the children to indicate the hierarchy.
When the children are selected, a new hierarchy section appears in the Properties Bar allowing you to choose which properties the child transforms with, such as the position, angle, and whether the child destroys with the parent. At runtime the child will follow any changes to the parent (for the enabled properties) - often giving a visual appearance that the objects are connected, or form a single larger object.
Once a hierarchy is set up, other options also appear to detach objects: Remove from parent to remove a child from its parent, and Remove all children to detach the entire hierarchy below that object.
The root instance also has a Select mode property that, similar to containers, allows automatically selecting the entire hierarchy, also optionally with selection wrapping. If this is enabled, you can always hold Alt and click an instance to select it individually regardless of the select mode. The layout's editor properties also include a Show hierarchy option that lets you toggle whether or not arrows indicating the hierarchy, pointing from parents to children, are shown on top of objects.
The layout view will preview hierarchies both when previewing timelines and when previewing behaviors that support previewing.
Editing meshes
You can create meshes for certain kinds of objects in the Layout View, as the editor counterpart to the mesh distortion feature. This lets you do things like create fluid level designs as shown in the Mesh platforms example. Meshes also affect collisions, so behaviors like Platform interact with them as they appear.
To create a mesh, right-click an instance and choose Mesh►Create mesh.... You must specify a mesh size of at least 2x2. Once created, the mesh appears highlighted in green, with new green handles that you can click and drag to adjust the mesh. The mesh starts in a simple grid that does not alter the appearance of the object - once you move a mesh point it will start to change from its default appearance.
You can also hold Shift while dragging a mesh point to move it without distorting the image. This can create a kind of mask or cut-out appearance.
When you click a mesh point, it will also appear selected and display properties for that mesh point in the Properties Bar. This allows precise control over the exact details of the mesh point, as well as providing informational values such as the mesh column and row. The Z elevation of the mesh point can also be modified in the Properties Bar, allowing for 3D mesh distortion. To learn more, see the tutorial Using 3D features in Construct.
Once an object has a mesh you can access some new options in the Mesh sub-menu:
- Set mesh size: change the number of columns and rows in the mesh. Note this will also reset the mesh back to its default grid.
- Reset mesh: resets the mesh back to its default grid, which does not alter the appearance of the object.
- Stop editing mesh: removes the green handles so the mesh can no longer be edited, restoring the default selection for standard move and resize interactions with the object. Once selected you can use the Edit mesh option to go back to editing the mesh.
- Remove mesh: removes the mesh entirely, reverting the object to not using a mesh.
The layout's editor properties also include a Show meshes option that lets you toggle whether or not the green mesh outline is shown on top of objects with meshes.
Other
To go to the associated event sheet, press Ctrl + E or right-click and select Edit event sheet.
The Z order of objects within a layer can be adjusted by right-clicking and selecting Z Order►Send to top of layer or Z Order►Send to bottom of layer. You can also open the Z Order Bar Paid plans only for advanced control.
Objects can be snapped to a grid for tile placement, and the collision polygons of the displayed objects can also be outlined. These features can be enabled in the layout's properties.
The right-click menu in the layout view also provides some alignment tools under the Align sub-menu. These allow you to quickly space objects equally or align objects along their edges. When aligning, the objects are aligned to the particular object you right-clicked.
The Animations editor can be brought up by double-clicking objects with images or animations like Tiled Background and Sprite. You can also double-click Text objects to edit their initial text in a dialog.
Effects will be displayed in the layout view if enabled in project properties.